Rendering VR180 with Blender Eevee
Why am I doing this - or - Content is king
Since the early days when VR was nothing more than two tiny cathode tubes firing their β-rays directly at your eyes, I was a VR enthusiast.
Well it wasn’t actually firing directly at your eyes. There was an also tiny screen involved that offered a resolution of no more than 320x240 for most devices.
But what was true for those unquestionable experimental first devices, is still true for today:
The acceptance of these devices does not so much depend on the quality of the hardware, but on the availability of content that really makes a difference.
If software and especially games do not deliver an experience that you just can’t have at a desktop, then VR still is nothing more than a high price gimmick.
Today’s VR headsets already deliver a stunning resolution of above 1600x1600 pixels per eye, in which you can get perfectly lost in what you’re seeing - if what you are experiencing is something that a flat 2D screen (or even your high price 3D monitor that feels more or less like an aquarium) just can’t provide.
Ok, so much for my enthusiasm in this. Good VR content that entertains you for longer than 5 minutes per game is rare and I have a feeling as if the big content makers are waiting for almost everybody to have a VR headset at home to really start working for these devices - totally ignoring the fact, that almost no one will buy a headset if there isn’t anything to do with.
We really need to get started in creating VR content.
So i finally stared to try rendering VR content in blender.
While 360° pictures are nice to look at, especially if you want to have the feeling of really standing in some interesting place and being able to look around freely, 360° vision is not that great if you want to visualize something like a 3D model.
You’d always have to have something to look at behind you for the rare occurrence, that the user fully turns around.
Providing a real 360° vision in 3D is even harder because you can’t just take like four 3D shots of some environment and stitch that together. You’ll get weird 3D stitching artifacts that will break your immersion. This is at least true for real videos that are shot with real lenses.
There are ways to create a correct 360° 3D images and videos in blenders cycles renderer, but I’m not going to cover that here for the one reason that motivated me to create VR180 content with blender eevee:
Blender cycles is horribly slow!
The problem with rendering video content for VR is, that you don’t prepare exactly what the user will see, instead you’ll need to prepare everything that the user may be looking at.
The VR180 video format puts some constrains on the users freedom to move his head, that have proven to be acceptable.
You’ll still have the immersion from being able to direct you vision by slightly moving you head, but you’re forced to stay within the 180° that are in front of the camera.
This enables the content creators to really focus on some specific setting on the one hand, on the other hand creators can now really record such scenes with a physical camera, without having to apply some weird hacks to remove themselves and everything else behind the camera from the scene.
Especially you can record such a scene with just two physical or virtual lenses.
The fact that you can’t really turn your head 180° while watching such a video quite nicely masks the errors that you’ll get in your 3D projection because the two lenses are always pointing to the front.
This is also true for your eyes. If you could somehow look 90° to the left without turning your head for example, your eyes would line up with the left eye being in front of the right eye, providing no 3D vision at all.
The angle you’re free to move your head is effectively 180° minus the field of vision of your headset. This will be something around 60° for most devices.
So much for the basics - let’s get back to blender
The reason why we probably don’t want to use cycles is that the resolution we’re going to need is laughably high. 4k is already the lowest resolution you’ll probably want to use, because it needs to hold all the 180° of vision per eye. Projecting both eyes into one frame effectively divides that resolution into halves for one direction of your choice, which will typically be horizontal.
So we’d chop our field of vision out of the already halved resolution and then reproject it for the eyes.
In the end 4k will leave us with a resolution that is already lower than what could be possibly displayed per eye on today’s devices.
That’s why 5.7k (5760x2880) became the de-facto standard for nowadays VR180 video, as it leaves some space to crop out your field of vision an reproject it for the eyes.
Rendering a resolution that high with a moderate quality setup in blenders cycles typically takes something around a minute on nowadays hardware using the GPU.
Trying to evade that I came up with three setups which all had their pros and cons. Two of them are closely related.
- Use eevee’s default camera with 160° fov and reproject that using cycles
- 180° Mirrors
2.1. Orthogonal Projection
2.2. Classic Camera 90° fov
I will give every setup it’s own headline to dive into the details. You should be familiar with normal 3D rendering, as I am not going to cover this here.
Use eevee’s default camera with 160° fov and reproject that using cycles
What sounds rather odd in the first place, actually works quite well.
You just set up your scene as you’d normally do. If you want to render a 2D preview of what you’re going to have as a result, set your camera to 90° fov and test.
If you have a player that supports normal (non VR) side by side video, it’s a good idea to first render one of those classic sbs 3D videos, to make sure your 3D camera settings suit your scene.
I’m talking about virtual eye distance and stuff like this (again: you should already know about that).
If you’re satisfied with what you see, widen your field of view to 160° while keeping your 3D settings. This time your output should not be side by side, but one video per eye.
I rendered into squares of 4096x4096.
The trick of the hybrid setup is, that we are going to use cycles to do the actual equirectangular projection.
I started with a unit cube. Then I scaled it so that two of its sides took up an angle of 160° viewed from the center.

Now when you put a 360° 2D camera into the center of that volume, it will see two big faces covered by 160° field of view each, with 20° remaining for the small sides.
This adds up to a 360° spherical view.
So all we have to do now, is to take our pre rendered (by eevee) squares and put them on the big faces as a texture.
Set the shader to emission and set every render pass or bounce in cycles performance settings to 1 (cycles performance settings).
We don’t need light bounces here - every incoming ray of light is exactly that. The incoming ray of light we want. Nothing else.
Set up like that, cycles can be surprisingly fast. Unfortunately it’s kinda unusable for anything besides pre lit scenes this way.
But still we have a setup that is faster than directly rendering the scene with a VR180 3D camera setup in cycles, even though we now have two render passes instead of one.
The downside of this setup is that we do not get a full 180° field of view. You can’t set up a 180° fov camera in eevee. That’s impossible with a rectilinear projection.
You wouldn’t be able to place an equirectangular camera inside a helper volume in cycles anymore because it would need to be 0 units thick. There is no room for anything else if you are surrounded by two faces with each of them taking up 180° of your vision.
Effectively this, let’s call it VR160, vision comes close to what most VR180 videos actually are. Even googles own VR180 creator fades out to the borders with something that might be as well 10° of your fov in each direction.
Unfortunately there is another bad thing about the intermediate projection using eevee:
A wide angle rectilinear projection of more than 90° greatly overemphasizes things close to the border, while scaling down the things in the center of your projection at the same time. This might be a cool effect for some use cases, but in our case we need to use a resolution high enough to ensure that what is in the center of our projection is still visible with an acceptable amount of detail.
Knowing these unpleasant limitations of eevees camara, I tried to trick it into rendering what I want…
…by the use of mirrors!
Given my scene is divided by a plane (a 360° environment split into halves) and the edge of my mirror lies within that plane, than I want my mirror to reflect everything cut by that plane to the edge of my image, with the rest of one side of the space divided by the plane being projected to the image like a 180° fisheye would do.
Having a fisheye projection is actually sufficient for VR180 as it has an option for that. Uploaded to youtube these videos will be silently converted to equirectangular in the background and googles VR180 creator will accept them as input.
The best mirror for this job would probably be something parabolic, but I wanted to spare myself those calculations and went for something that could be calculated with dull trigonometry.
So I went for cutouts of a reflective ball. I tested two types of surfaces. Unfortunately non of both gave perfect results. I guess this has something to do with how the exact reflections at the surface of the ball are modeled. The amount of distortions goes down the higher resolution you sphere is, but I found out that at some point a high amplitude but low frequency distortion seems to be more appealing to the eye than a low amplitude high frequency distortion.
The same thing applies for the two primitive sphere types blender has to offer. There is the ico-sphere consisting of some amount of equally sized triangles and the uv-sphere with is quadric faces of variable size which depends on their distance to the poles.
I ended up using the ico-sphere, because the reflections (and the distortions) at its surface where more appealing to me.
The resulting image does not only depend on the type of mirror in use, but also on the camera.
If one requirement of the projection is, that things that lie on the dividing plane are projected to the edge of my image, than effectively a ray at the edge of the image that is projected through the camera must hit the edge of the mirror at an angle that projects it into the dividing plane.
Well let that sink in. This boils down to the fact that every rectilinear camera and even the orthogonal camera is suitable for this purpose, given the mirror fits to the camera.
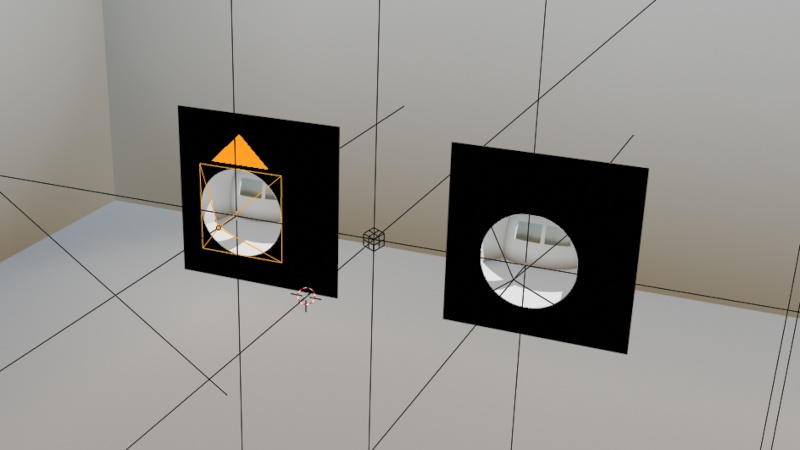
For the sake of simplicity I started with the orthogonal camera.
The Orthogonal Camera
The orthogonal camera can be modeled as parallel rays of light inside a cuboid volume. There is no such thing as a field of view. I thought this might simplify things.
The first thing I’d need to do is make my camera exactly the size of the mirror, so the mirror fills the cuboid projection volume.
Now I need to calculate the angle of the mirror surface at its very edge, so that a parallel light ray from the camera will be reflected into the dividing plane.

That’s an easy one it’s 45°. My mirrorball must be cut in a place where it’s (smaller) angle to the middle axis of my projection will be 45°. Referring to trigonometry that will be cos(45°) = 1/2 * √2 ≅ .70710678 units from it’s center (given a sphere with radius 1).
The rectilinear 90° Camera
Another quite simple case would be a camera with 90° field of view. A camera like that would spin up a cone with at max 45° to it’s middle axis. So a ray at the edge will not hit the mirrors edge parallel to the middle axis, but with exactly 45°.
The angle between the incoming ray from the camera and the ray reflected by the mirror into the plane is no longer °90 but 135° (90° + 45°).
As a result the calculations for the required mirror become a little more complicated.

I do not know why this results in exactly half the angle I needed for the ortho case (probably there is an easy explanation).
This time I need to cut the mirror ball cos(22.5°) ≅ .92387953 units from its center.
Conclusion
Each of the methods I tried to get VR180 out of eevee has the potential to replace a real equirectangular (or at least fisheye) camera. The first method still needs an additional cycles pass and both of the mirror setup introduce distortions.
I can’t even tell which one of the latter I like more. Their distortions seem to be quite comparable even though they differ in the details. So if the goal is geometrically correct projection I’d probably still go for the two pass solution.